Targeting, customising hotbars, combat tricks, party list tips and macro advice to get new FFXIV players ready for Endwalker.
For newcomers, Final Fantasy XIV can seem daunting. Not only does the MMO boast a rich world of adventure, sidequests, captivating characters and more, but it comes packaged with extensive control options to help you to interact with it all.
The game’s development team has found an elegant solution for controller-favouring players, one that matches the versatility of the keyboard and mouse scheme. Yes, you can use that pairing for FFXIV on PlayStation, but you’d be missing out on one of the most satisfyingly polished controller setups created.
With a few button combos, you can take down world-ending leviathans, race across the vast plains of Thanalan or break out an elaborate dance sequence for the entertainment of others. Read on for a step-by-step guide to tailor your controller – DualSense or DualShock 4 – to best suit your needs. This is written from experience: these beneficial shortcuts have been learnt from nearly a decade of playing FFXIV with a controller.
The basics: navigating the menus and controller setup
Navigating the menus
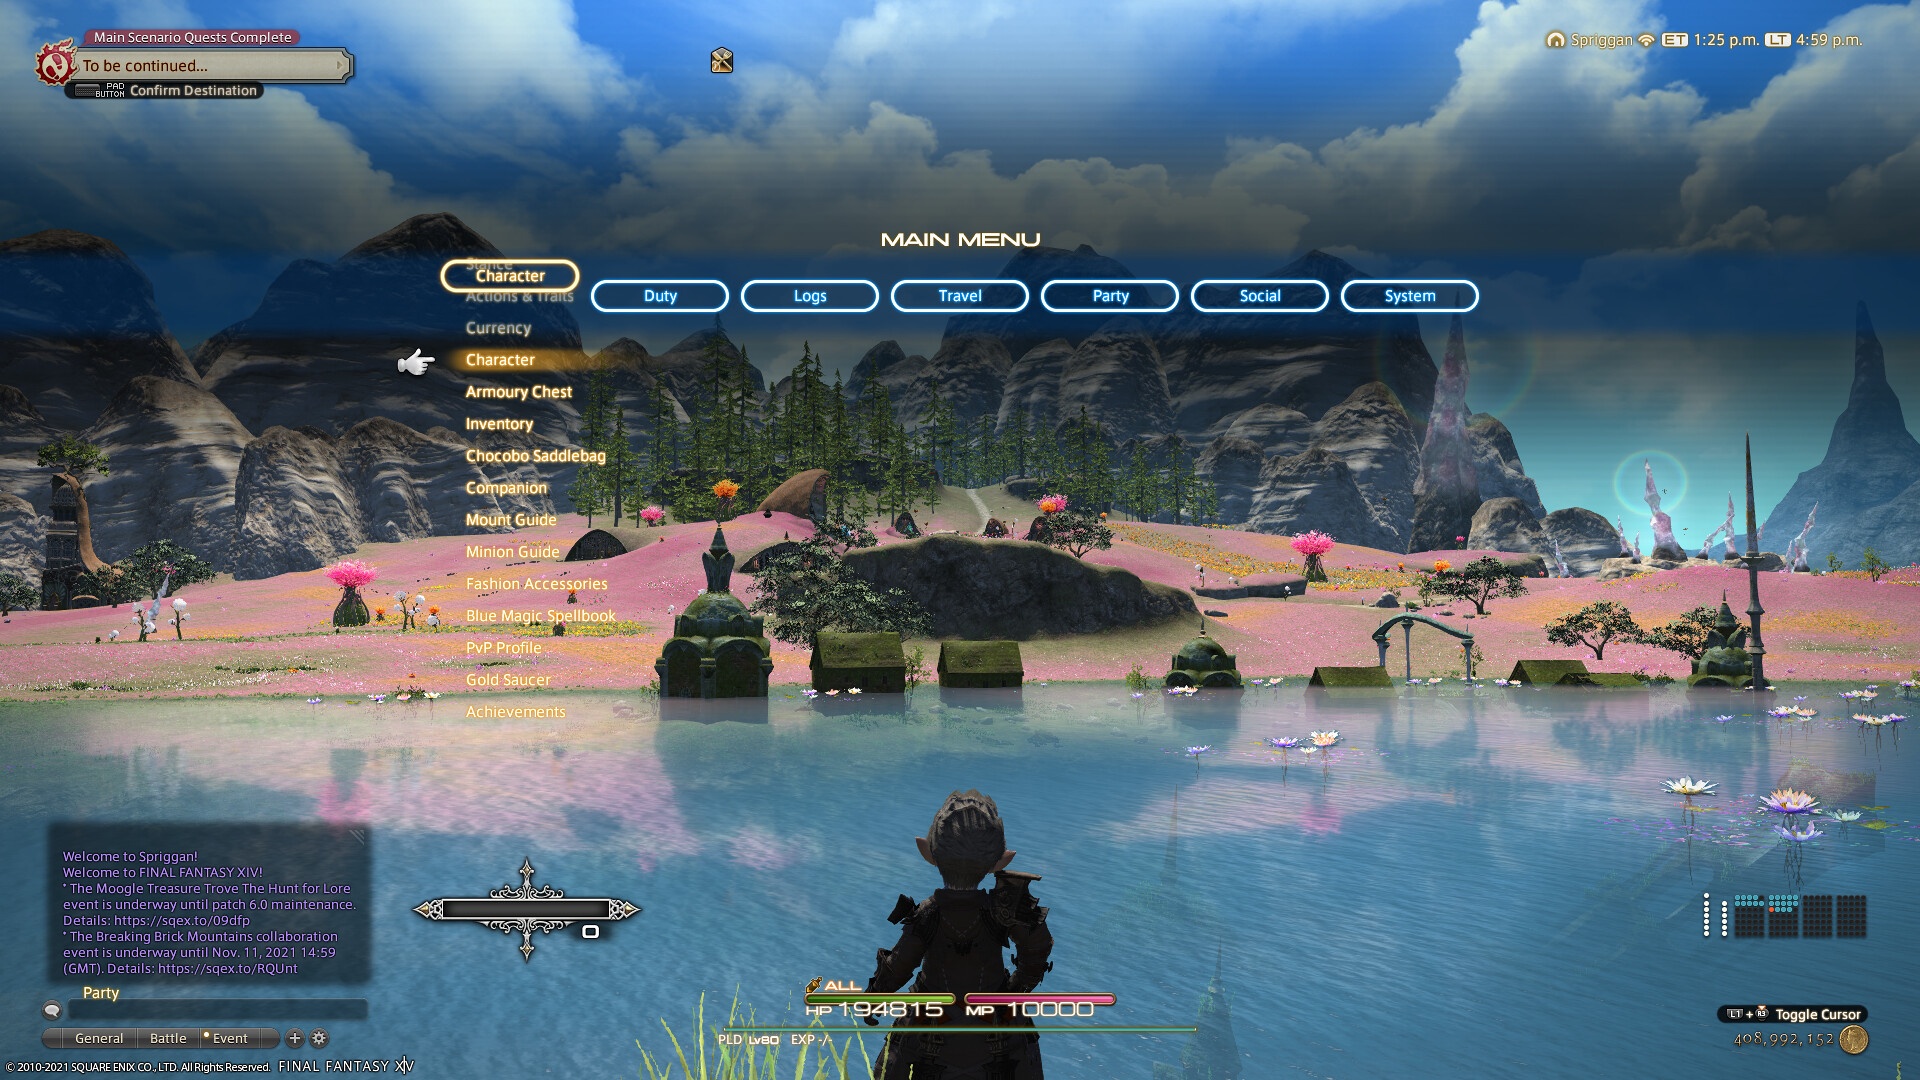
FFXIV’s menu system comes in two styles: one tailored for a controller, the other suited to mouse and keyboard. The first (above) will be familiar to long term PlayStation owners: it’s similar to the PS3’s XMB (Cross Media Bar) main menu. You’re free to choose which one you prefer. Everything – from character gear to system customisation – can be accessed from here. (You’ll find this setting in Character Configuration > UI Settings > General)
To navigate through whichever menu format you chose, you’ll want to press Options to first open it, then the D-pad to navigate through the menu options.
Key information will by default appear on your UI overlay while playing. This includes your mini-map, quest lines, chat window and more. You can move between these with a press of the Touchpad. You can customise their layout, size, position and whether they appear on the screen. (You’ll find this setting in the main System > HUD)
Setting up your controller
First of all you’ll want to get comfortable with your basic controller setup. If you’re the kind to enjoy custom button configuration, you’ll be able to change button mapping to your liking. By default, Triangle will have you jump, Square will open the mini-map, Cross will be used to target things around you and otherwise confirm, and Circle will be used to cancel. You can decide to swap these to your liking. (You’ll find this setting in System Configuration > Gamepad Settings > Button Configuration)
There is also an option to reverse X or Y axes for those who prefer to play with inverted controls. (You’ll find this setting in Character Configuration > Control Settings > General > Camera Controls > Gamepad)
Once you’ve made sure the controller responds however you prefer, let’s start looking into movement.
Moving around Eorzea
There are two types of movement: Legacy and Standard. In Standard, your character will always orientate themselves towards the direction you move the camera, their back to you. In Legacy, the character isn’t locked. You can move the character and camera independently, though the latter will always be locked to the former, so your character will always be at the centre of the screen.
While Standard allows you to make more subtle and immersive moments – backstepping, side-stepping – it can slow you down in combat. If you want to stay nimble, you may find that Legacy will allow you to dodge attacks quicker. (You’ll find this setting in Character Configuration > Control Settings > General > Movement Settings)
You can choose the camera’s distance from your character, zooming in and out, by holding L1 and using the joystick to adjust camera distance. This has benefits for combat, adjusting your field of vision to keep track of your surroundings, as well as telegraphs of where your enemy’s next attack might land in an arena.
There is also an option to go first-person if you zoom in fully. Good for checking out a friend’s new glamour (outfit) up close, but not so much for anything else. You’ll probably want to disable this in combat unless you want to see death up close. (You’ll find this setting in Character Configuration > Control Settings > General > Camera Controls) It’s still possible to switch to first-person by pressing R3 afterwards, if you ever want to!
Eorzea is a big place. By default, you can activate autorun while moving on foot or riding a mount by first holding the left joystick in the desired direction, and then pressing L1, which leaves you to only worry about steering. You’ll disable autorun with another press of L1, or by bringing the joystick to the opposite direction you’re running to. (You’ll find this setting in System Configuration > Gamepad Settings)
Once you’ve reached a certain point in the game, you’ll be able to use mounts to soar through the skies and swim underwater. You’ll have two take off options to choose from when you want to fly, Auto or Manual. Auto means you’ll need to press the jump action once to fly, while Manual will have you jump twice to take off. (You’ll find this setting in Character Configuration > Control Settings > General > Flying Mount Takeoff)
The intricacies of targeting
The basics of targeting
There are many different options you can choose from when it comes to targeting. In general, you’ll want to use the D-pad. Navigating left and right will toggle between available targets on the screen from one side to the other. Navigating up and down will toggle between the allies in your party list, if you currently have one. There are a lot of ways to customize these rules to best fit your needs, so let’s dive in.
As you start targeting things around you, you’ll notice there are two levels of targeting. We call these Temporary targets (“soft targeting”) and Selected targets (“hard targeting”):
Soft targeting means the target you are currently navigating to will be highlighted and pressing an action button will perform that action to that target but return to your hard target straight after if you have one. Alternatively, pressing Cross on a highlighted target will confirm that target and make it your new hard target.
When in combat or if your weapon is drawn, hard targeting an enemy will activate the auto-attack, a continuous stream of basic attacks at regular intervals determined by your weapon. Soft targeting can come in handy when you need a spot heal on an ally, but want to keep auto-attacking your main target. It’s an invaluable technique that’s worth learning. With experience, you’ll seamlessly use both soft targeting and hard targeting as you go about your Eorzean adventure.
Targeting allies
Some time into your adventure, you’ll start pairing up with other players in a variety of ways – randomly matched for dungeons or chosen allies from your friends list. The easiest way to keep an eye on your allies, and select them during combat, is your party list. The party list is a menu that sits on your UI, displaying your party members, their current class/job, HP, and more.
If you’re a healer, you’ll have to keep an eye on your party’s HP regularly, so you might want to organise your party list according to your needs. For example, you can customise your settings so that your tanks and fellow healers will always appear on top of your list, with the DPS in your party appearing in the bottom part. (You’ll find this setting in Character Configuration > UI Settings > Party List > Party List Sorting)
You can navigate through your party list from either the top or the bottom with the up and down buttons on the D-pad, so you’re always a few button presses away from your desired target, regardless of where they are on the battlefield as long as they’re in range of you. You can also pick a different order depending on which class you’re in, and have your party sorted differently depending on if you’re healing, tanking, or DPSing!
Targeting enemies
First of all, when it comes to targeting enemies, your targeting options will be different depending on if your weapon is sheathed or drawn, which you can toggle between by pressing L3. For example, when you have your weapon out, pressing the D-pad horizontally could toggle between all enemies around you from left to right or right to left, but when your weapon is sheathed, the number of selectable targets around you will also include friendly NPCs, allies, and all objects you can interact with. This offers more precision in combat, skipping over targets you’re unlikely to need while fighting. NPCs will thank you! You can customise the groups of targets you want selectable for each stance (sheathed/unsheathed) individually. (You’ll find this setting in Character Configuration > Control Settings > Filters > Target Filter Settings)
Advanced techniques
In combat, there are a few more targeting techniques to select enemies in a pinch that can be useful. Ultimately, it will come down to personal preference and you might only use your favourites, but it’s good to know all of them exist.
First, holding L2 or R2 then tapping R1 (or L1) will cycle through the targets in your view from left to right (or right to left). If you’re currently hard targeting an enemy, this will switch your hard target to the enemy directly to their left or right, depending on the button combination you use. This shortcut is particularly useful to quickly switch to an adjacent target.
If you’re tanking or otherwise involved in enmity (aggro) management, holding L1 and pressing up and down on the D-Pad will highlight targets straight from your enemy list, a UI element that lists the hostile enemies currently engaged with you that also displays an enmity meter. If you’re tanking and notice that one of the enemy’s enmity indicator has gone green (which means you no longer hold aggro over it), you can select it straight from there and quickly remedy that.
Finally, if you really want a fully customised system to target anything you want straight away, you can also set up custom target filter settings. To use these, you’ll need to hold L1 followed by circle, cross, triangle or square. Each will give you access to a unique targeting group that you can customise for yourself. For example, you can choose for your default mode to target engaged enemies, other enemies and NPCs, and by selecting one of these custom groups, seamlessly switch to a mode that only targets engaged enemies. (You’ll find this setting in Character Configuration > Control Settings > Filters > Target Filter Settings > While weapon is drawn.)
Oh, one last thing! There’s an option to disable targeting pets and minions when in battle. You might want to turn that on! (You’ll find this setting in Character Configuration > Control Settings > Filters > Target Filter Settings)
Sorting out your actions with cross hotbars
What’s a cross hotbar?
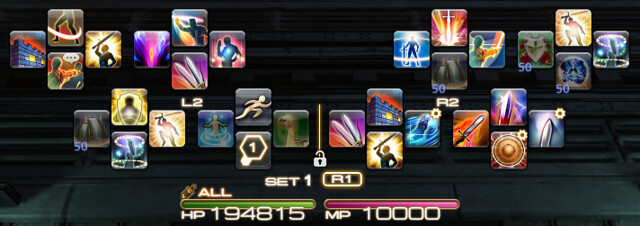
Cross hotbars are Final Fantasy XIV’s controller version of classic hotbars. You get a total of 8, each featuring 16 slots for skills and actions. That means a grand total of 128 slots. Sounds like a lot, right? But you’re very unlikely to need them all, and each hotbar is quickly selectable with a tap of a button combination.
By default, holding L2 or R2 will highlight one side of your main cross hotbar, and pressing any of the directional or face buttons will activate the related skill.
Instead of holding L2 or R2, you can also elect to press it once and toggle your main hotbar on and off. (You’ll find this setting in Character configuration > Hotbar Settings > Cross > Cross Hotbar Controls)
Cross hotbars are your shortcut to essential combat skills, like your unique party Limit Break, which when activated, could annihilate a boss, protect your party or resurrect the fallen. But they aren’t just for combat. You can fill them up with a variety of menu options, items, shortcuts, and macros: call your chocobo, wave to a friend, teleport back home. All of these aren’t directly combat skills, yet can be accessed straight from your hotbars, and sorted in whatever order you want. Even though we’d suggest separating your combat skills from your QoL skills, ultimately, it’s your choice and whatever sorting logic feels comfortable to you will suit you best.

Navigating between your hotbars
By default, you’ll always have one cross hotbar on your screen at all times, but remember, you’ve got 8 of them! To swap from one hotbar to another, you’ll need to press R1 and follow-up with any of the directional or face buttons. Each button will lead you to a separate hotbar, and the button’s corresponding hotbar number will appear on the screen as you hold L1.
You can also do a single press of the R1 button to toggle to the next hotbar in order, although you’d have to go through all 8 (those completely empty excepted) to get back to your main one.
Most of the jobs available in Final Fantasy XIV will only use up to two full cross hotbars’ worth of skills at their maximum level, and even if you decide to level every single one of the jobs available, you don’t have to worry about running out of space; hotbars are linked to jobs. Switch from white mage to ninja, and the hotbars you’ve created for one will be switched out for the set you created for the other.
One important setting that will optimise your hotbar use is shared hotbars. This setting will let you assign some of your cross hotbars to be shared between all classes, while the rest are separate and class/job-specific. For example, you can set up a shared hotbar filled with evergreen command shortcuts, such as sprint, teleport, mounts and menu options. The remaining hotbars would feature your job skills, and would automatically swap as you change jobs. (You’ll find this setting in Character Configuration > Hotbar Settings > Sharing > Shared Hotbar > Cross Hotbar)
Expanded controls
Another quick trick you can take advantage of is to activate the expanded hold controls. This will allow you to access another cross hotbar, or rather, two half cross hotbars, from the R2 to L2 input and L2 to R2 (holding one, then the other). Of course, you can customise which hotbars you want these inputs to lead to. (You’ll find this setting in Character Configuration > Hotbar Settings > Custom > Expanded Hold Controls (Cannot Use Toggle Type) > Enable expanded controls with L2+R2)
W cross hotbars
The W cross hotbar (WXHB for short) is a setting that allows the display of a full secondary cross hotbar on your UI, on top of your main cross hotbar. As you level up your jobs to the level cap, the amount of skills you will need in combat will go up, and having this option turned on will become increasingly important so that you can display and keep track of all your combos, procs and cooldowns. (You’ll find this setting in Character Configuration > Hotbar Settings > Cross > W Cross Hotbar Display Settings)
To get the maximum benefit from this setting, you’ll also want to activate the WXHB access by double tapping L2 and R2 and make sure to enable directional buttons. (You’ll find this setting in Character configuration > Hotbar Settings > Custom > W Cross Hotbar Display Settings)
To access this secondary hotbar, you’ll need double tap L2 or R2. You can also adjust the double tap timer to determine how fast or slow your input needs to be to register. Adjust, and select what you’re most comfortable with. You can also choose where to position this new hotbar on your UI independently from your main cross hotbar. (You’ll find the display settings in Character Configuration > Hotbar Settings > Cross > W Cross Hotbar Display Settings, and the customisation settings in Character Configuration > Hotbar Settings > Custom > Enable WXHB with simultaneous L2 and R2 double tap.)
By customising hotbars and practicing the button combos, you’ll soon be able to toggle between different skills at a lightning-fast pace.
Automating with Macros
A note about macros on controller
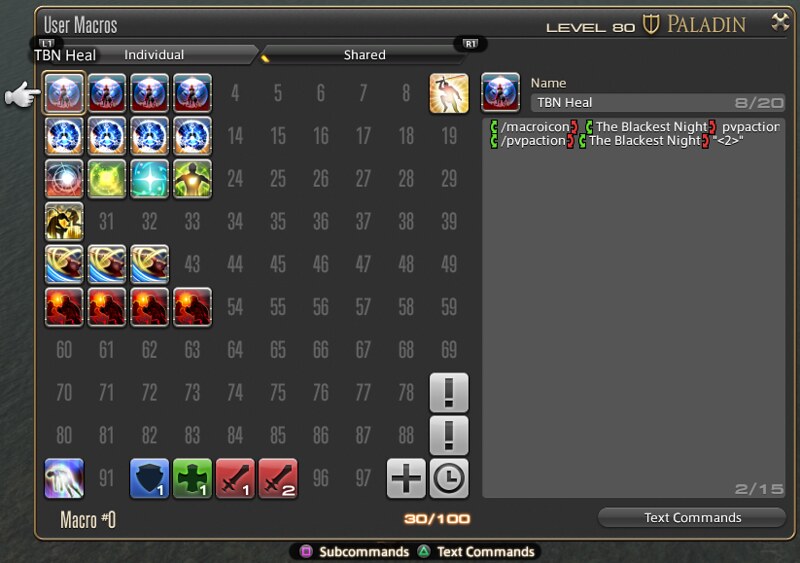
Macros have near unlimited uses in FFXIV! You get 99 macro slots in your personal macro window that you can fill with anything you want. However, as a controller player, there are a few things they can help you do. Perhaps you might want a macro to quickly communicate to your team that it’s your first time in an encounter? There’s a macro for that! Perhaps you want to change the design of your UI depending on which job you are playing? There’s a macro for that! Perhaps you want to create an elaborate dance composed of a string of 20 emotes and use that every time you defeat an opponent? Unfortunately for your party, there’s a macro for that! All of these macros you can create and assign to your hotbars for quick access. (You’ll find this setting in System > User Macros). There are plenty of very complete macro guides out there and an infinite amount of macro possibilities, so have fun and be creative!
Last but not least, did you know that you can assign macros for the L3 and R3 buttons? The last two slots of your macro allowance, 98 and 99 specifically, can be attributed for direct access from the button configuration menu. You could use L3 to set your current target as a Focus Target, for example, displaying their health and other information in a dedicated UI element! A personal favourite trick of mine is to create a macro to use the Sprint action, and allocate it to L3, as it provides me with a universal access to sprint across all my jobs on a button that makes for a very console-like experience. (You’ll find this setting in System configuration > Gamepad Settings > Button Configuration)
There’s plenty more combinations possible. Once you’re comfortable, you can dive into the world of macros, HUD customisations and much more. The above should set you on the right path to mastering the sublime, genre-defining controller implementation of Final Fantasy XIV. See you in Eorzea, adventurer!






Comments are closed.
8 Comments
Loading More Comments