


Hey, gang!
For those who don’t know me, my name’s Noel and I’m part of the PSN Store Design Team. I’m back today to talk about making your own custom Themes for the PSP.
_____________________
Here’s what you’ll be needing:
- a computer that runs Windows
- a digital image editing program
- the “PSP Theme Toolbox”
- a little bit of time
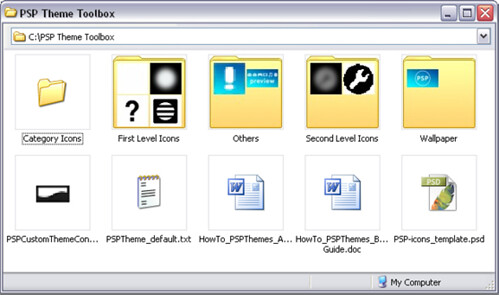
First thing you need to do is download the “PSP Theme Toolbox” zipped file. You can unzip it anywhere, but if you’ll be doing a lot of Themes or want to use the pre-made default while going through this walkthrough, you’ll have to extract it directly to your C:\ drive (C:\PSP Theme Toolbox\).
_____________________
In the “Toolbox”, you’ll find:
- Icons and Wallpaper templates
- “PSP Custom Theme Converter” program
- Default Project saved as a “.txt” file
- “How To” Basics and Advanced Walkthroughs
- Layered PhotoShop template of icons
- Unlike for PS3 Themes, there is an actual program so you won’t have to be worrying about XML code or funky compiler programs.
- Open the program (PSPCustomThemeConverter.exe) and we’ll go though it, tab-by-tab.
NOTE: If you’d like to see a working example of each item, go to “File\Open” and select “PSPTheme_default.txt”. This will only work if you’ve extracted the Toolbox to your C:\ drive because of the way the project file links to the associated images.
The first tab is the “Information” Tab.
- Put the name of your Theme or its description in the “Title” space.
- The “Product ID” is where you assign what the Theme is associated to, e.g. Game, Anime, Movie, etc.
- The “Version” is helpful if you want to do keep track of multiple versions of a Theme, but isn’t necessary either.
The second tab is the “Wallpaper” Tab.
- Wallpapers have to be:
- Click on the “Folder” button to browse and select any image that matches the required size and format.
- If the image you select is not useable, an “Error” window will pop-up letting you know what needs to change.
- You can click the “Preview” button to preview your wallpaper once you’ve selected one that is workable.
-
* 480 x 272 pixels
* 24-bit Color Image
* BMP files
Next tab is called “Category Icons”, and is for the main XMB Icons.
- These icons need to be:
-
* either 64 x 48 pixels or 48 x 48 pixels
* 8-bit Index (32-bit Color)
* TGA, PNG, or GIM image files
The “First Level Icons” Tab is for the icons that appear within a category on the XMB.
- These are the sub-icons that appear below the category XMB icons.
- Double click on the icon line or click the “Edit” button.
- You’ll see a request for two files: the “Icon Body” and the “Icon Focus”. The “Body” is the actual icon.
- The “Focus” is the glow that pulses around the icon when you highlight that icon. If you’d like to keep things simple, or not worry about having a pulsing glow around your selection, you can either use the default focus image or leave that space blank.
- The icons need to be:
-
* 32 x 32 pixels (Body)
* 48 x 48 pixels (Focus)
* 8-bit Index (32-bit Color)
* TGA, PNG, or GIM image files
The “Second Level Icons” tab is for the “Settings” Icon. That’s right; the “Settings” wrench gets its very own tab!
- Just like the First Level Icons, these need to be:
- Its focus needs to be:
-
* 32 x 32 pixels
* 8-bit Index (32-bit Color)
* TGA, PNG, or GIM image files
-
* 48 x 48 pixels
* 8-bit Index (32-bit Color)
* TGA, PNG, or GIM image files
The last tab is “Others”.
- The “Preview Icon” is the tiny thumbnail that appears when you choose your Theme, and needs to be:
- The “Preview Image” is the preview for the Theme, and needs to be:
- The final option is “Theme Color”. Here, you can assign a particular highlight colour to your Theme, or have it change monthly automatically.
-
* 16 x 16 pixels
* 8-bit Index (32-bit Color)
* TGA, PNG, or GIM image files
-
* 300 x 170
* 24-bit Color Image
* BMP
_____________________
Once you’ve assigned all of the Icons to your images, go to “FILE” and select “EXPORT”.
- Name your file, click “SAVE”, and the program will create your PSP Theme File (.PTF).
- With your PSP connected to your computer in USB Mode or with a compatible Memory Stick connected, place the file into the proper “Theme” folder ( \PSP\THEME ).
- Disconnect your PSP or insert the Memory Stick in to your PSP.
- Under “Settings”, select “Theme Settings”, and then “Theme”.
Your new Theme should appear in the selectable list.
_____________________
Good luck and have fun making your own PSP Themes!
“The world is but a canvas to the imagination.” – Henry David Thoreau:

Comments are closed.
61 Comments
Loading More Comments